
You are a beginner and want to get started with homebrewing? This blogpost aims to provide an overview over various brewing systems in various price ranges. Whether you’re not yet a homebrewer and just want to get started, or a seasoned enthusiast that wants to get an overview over potentials options for the next upgrade: This is for you.
Outline
Before discussing concrete options how a homebrewing setup can be implemented it’s important to understand the different setups. They differ in terms of agitation, heating (direct or indirect) and many other parameters. Another big decision in homebrewing is to choose your heatsource (gas, electric, campfire). Last but not least, we’ll talk about different “tiers” in terms of final beer amount, so the size of your brewing system. At the end, I will give my personal recommendation for various budgets.
Brewing setups
The most popular brewing setups are Brew in a Bag (BIAB), Wort kettle and lauter tun (let’s just call it WKLT) and Heat Exchanged Recirculating Mash Systems (HERMS). Let’s discuss how each of them works, their advantages and shorcomings so you can make your decision.
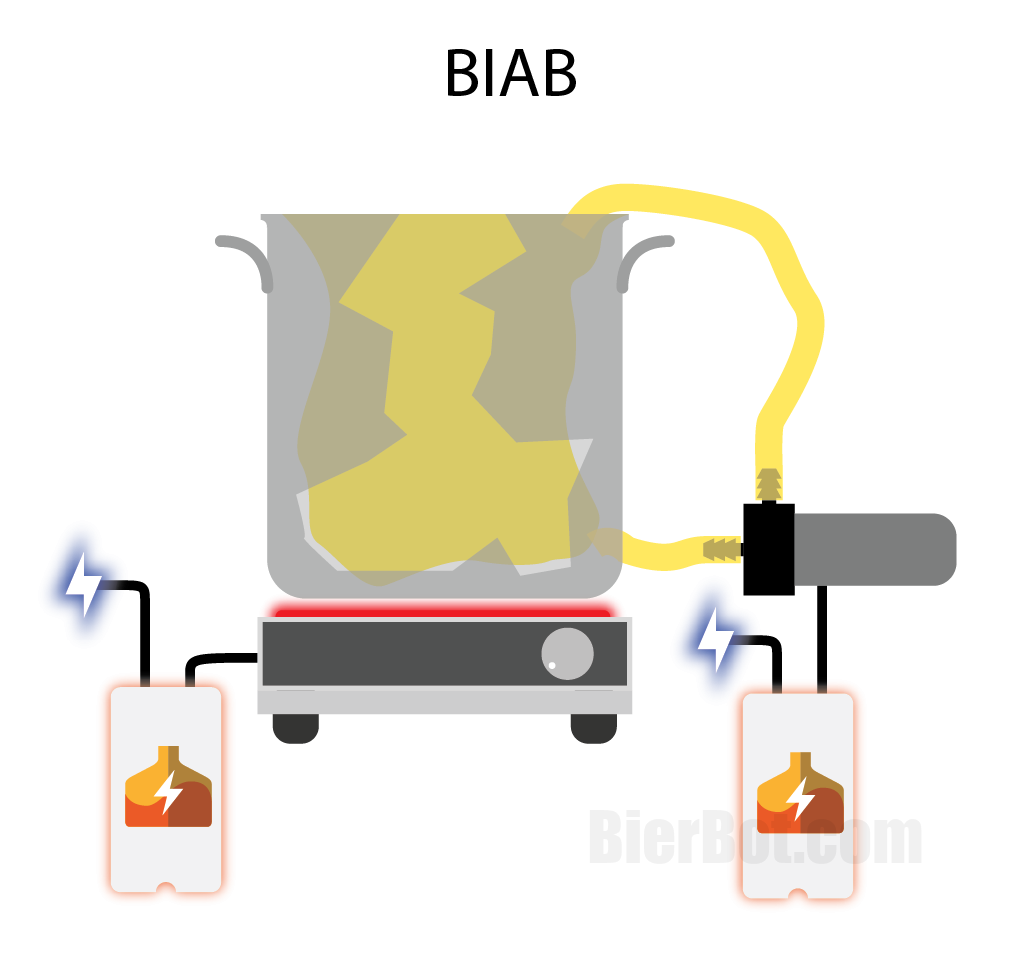
Brew in a Bag (BIAB)
The beauty of the BIAB system lies in its simplicity. Your only vessel is a mashtun and a laeutering tun at the same time. During mashing, grains are put into the bag (thus the name), and a pump constantly sucks worth out of the bottom of the vessel and pumps it up to the top so the worth has to make it through the grains for its next trip.
After mashing is done, you will simply pull up the Bag (including all grains) to the top and you’re immediately ready to start boiling.
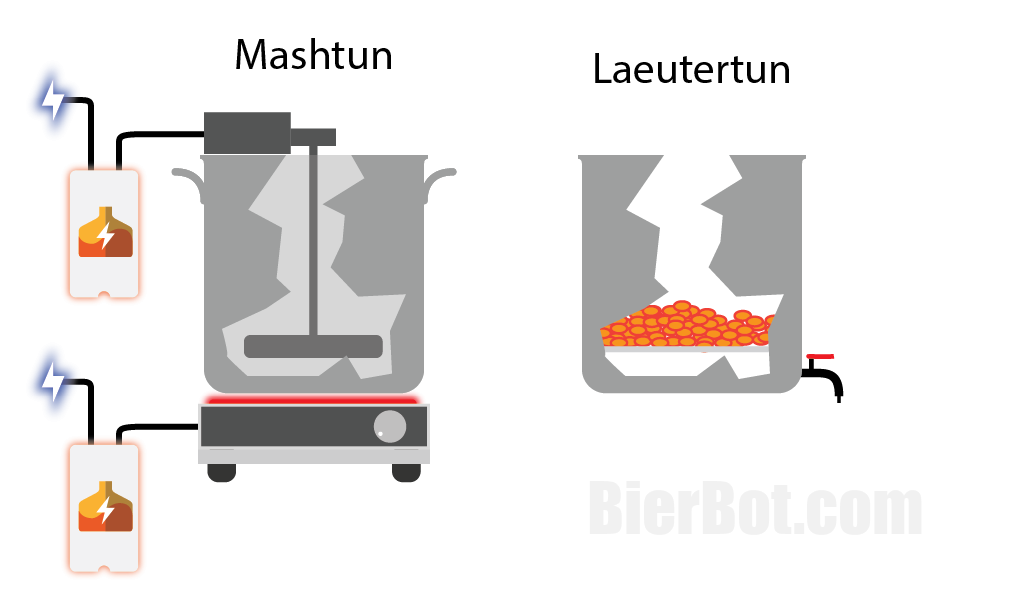
Wort kettle + lauter tun (WKLT)
This is the classical setup present in most big breweries – but it also works for homebrewers. Your mashtun is a vessel with a agigation device. Both water and grains are put into the mashtun. After mashing is done, you will transfer the worth into a lauetertun. Here, the worth will reset for a minimum of 15minutes. The grains will settle onto a lauter plate. After that, you can start opening the port underneath the lauter plate. Only wort (we calls this first wort) will make it through the filter (made of grains and the lauter plate).
While the grains settle in the lauter tun you have time to clean your mashtun and remove the agitator. This is necessary because the wort coming out of the lautertun will be transferred back into the mashtun – where the boiling will take place.
A variation to this setup is a “lauterhexe” based setup. Here you have a special, metal-made tube at the bottom of your mashtun. Like the lauter plate, it has a lot of small openings which hold back the grains but let the wort flow through. This way, you can spare the external lautertun. The downside of this method is that clogging becomes more likely.
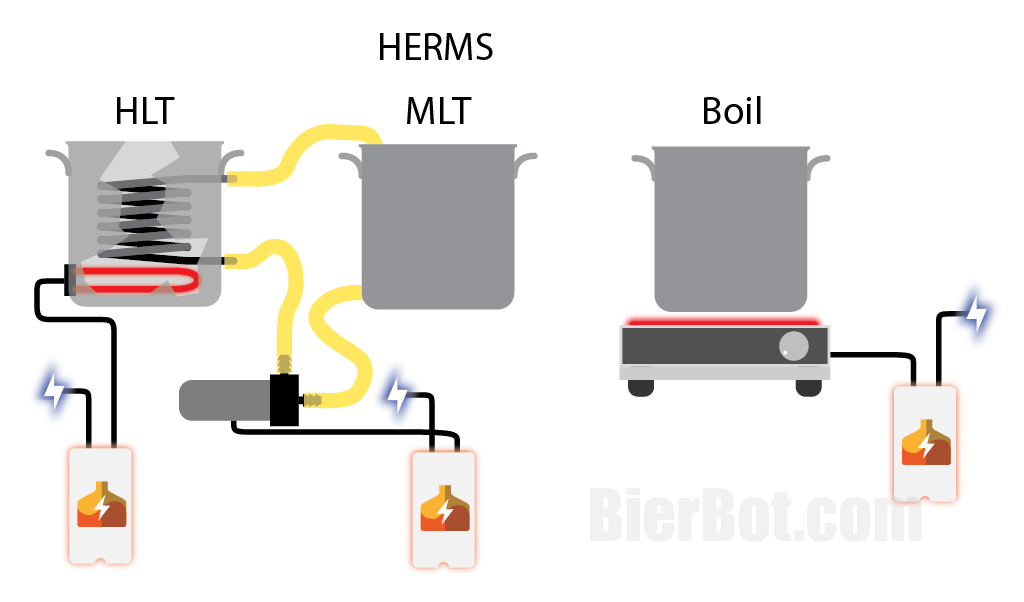
Heat Exchanged Recirculation Mash Systems (HERMS)
HERMS setups typically consist of three vessels: The Hot liquor tank (HLT), the mash lauter tun (MLT) and the boil kettle. The MLT has a lauter plate at the bottom, much like the lautertun of WKLT system above.
During mashing, the HLT is filled with water and will always be heated above target wort temperature. Wort is pumped from the bottom of the MLT through the heatexchanger in the HLT. Wort coming from the HLT back to the MLT will be thus not only grain free but also warmer then when they left the MLT.
For boiling, the connection going to the MLT is simply routed into the boil kettle. Lautering is done permanently, so need for this extra step.
Heatsource
This chapter will quickly go over the two main heatsources of your brewing setup. Despite enjoyed by some, we’ll not cover brewing over an open wood fire. We did a whole writeup about electric brewing, in case you want to dig deeper.
Electric
Electricity has the nice property of being broadly available without the need to get it somewhere. Also, it’s easier to automate, as a relay or switch is cheaper than a magnetic gas-rated valve. When you live in a country with a voltage (230V) sockets which also support 16A you can pull as much as 3.5kW for heating. If that’s not the case for you (i.e. the US has only 220V) and typical fuseboxes don’t support 16A, heating with gas might be worth considering.
Side note: If you heat with electricity your brewing control can be also used for controlling the temperature during fermentation – as fermentation will run on electricity, too.
Gas
Gas burners tend to offer more power. However, during mashing you may not need that because your worth should not be warmed up by more than 1°C/min. Handling open flames is IMHO a bit more dangerous and getting propane bottles is certainly more tiresome than plugging a plug into the wall.
Extensibility
Extending your brewing hardware according to your style of brewing is IMHO a big part of the fun. I truly believe in modular, partly DIY brewing solutions – that’s why there is this website & software. So take this with a grain of salt.
If you buy a All-In-One, high-quality, ready made system (like, i.e. a Grainfather G40) your guarentueed to some extend that things will work outside the box. But at some point you want to leave the normal tracks. Suppose, i.e. you want to brew a very strong Bock beer. For the G30, the absolute maximum grain bill is 9kg (20lb) (source). So you have to make sacrifices on your batch size (and keep in mind, any kg of malt will soak up 1l of water). Also dough balls may form.
If you have a DIY built or assembled brewing system, this will most likely be an issue. You just buy an additional vessel (and re-purpose the existing one) or maybe even upgrade your existing one with a smart trick. Also, great shops, like crafthardware.de exist that offer kits that work out of the box and are extensible.
Size of your brewing system
A larger batch size usually correlates with higher costs for your brewing setup. And it does not stop there: Fermentation needs also to be taken care of. Also: Running costs for heating and cooling increase (but that’s really the smaller portion based on experience). Smaller setups invite for more experimentation.
From a hobbybrewers perspective, I would define the following, three “brewing tiers” (cooking pot & stove option deliberately left out):
Batch size up to 20l / 6gal
This is where most homebrewers start. This is a nice batch size not only because of the affordable equipment, but also because one batch fits easily in one NC-Keg (19l / 5gal). This is also a nice size to get started on your own as all stuff that needs to be carried can easily be handled by a single person.
Recommended for beginners.
Batch size up to 50l / 13gal
This is where most homebrewers who started with 20l / 6gal go because they figure that they too many too thirsty friends (this is where we are brewing). 50l is the biggest batch size you can heat with a normal 230V/16A German power outlet (yielding 3.5kW). But, things are already too heavy to be handled by a single person, as the vessel weighs 50kg (wort) + 8kg (vessel) resulting into a whooping 58kg/130lb. Fermentation can be done by putting a vessel into a fridge (and maybe adding a heating map).
Not recommended for most beginners. If you are a high commitment person and maybe even have friends joining you from day 1, this might be viable as well.
Batch sitze over 50l / 13gal
This is already semi-pro turf. There is no longer a way to carry stuff. You need pumps to move wort from the brewing vessel to the fermentation tank. This batch size implies you know what you’re doing (unless you end up with huge amounts of sub-optimal beer). Fermentation requires professional fermenters (which require Glycol-Chillers).
This option is not recommended for beginners.
Typical setups for various budgets and sizes
In this section I want to give recommendations for various budgets and sizes. Keep in mind you don’t only need brewing hardware but also a vessel for fermentation. In general, the fermentation vessel should be 30% larger than your target batch size to leave some room for the yeast to climb during fermentation.
(Almost) No budget
Fun fact: you can start brewing without being anything other than the ingredients. We started brewing not only without any clue but also without money. We re-used a giant cooking pot from my mum. Our läutering tun was flowerpot frome a home supply store made out of plastic (grose!). As lauter sieve we’ve used flower pot flate, cutout some holes and used a mosquito net to hold the grains back. While I would certainly not advocate allowing the wort to make contact with plastic this setup got us started. And that’s the bottom line here: Once you understand the process of brewing get creative and use what you have. Try out and experiment!
Around 250€ / USD
For 250€ there are (at least no high quality) new All-In-One solutions. At this price point, you can either buy something cheap (which can also work), something used (look i.e. in your local homebrewing forum) or build something yourself. The first two options are probably pretty clear, so I’ll elaborate the third.
A “easy” way to build a cheap brewing setup yourself is to start with a 29l Weck. You probably want to add a Bag (if you go for BIAB) and a pump or something like a “Laeuterhexe” as first addition to be able to laeuter. After your first batch you’re probably tired of stirring yourself if you went for a laeuterhexe. So you can either build one yourself with a wiper motor or buy one. That’s probably when you cross the 250€/USD mark.
Budget of 500-1000€/USD
I see two main options here:
- An all-in-one solution like the Grainfather G30 (retailling for $900) or
- an extensible solution from crafthardware (i.e. a Biab Solo).
Fermenting can be done in a stainless steel fermenter. We have multiple from polsinelli in usage for a long time and are quite happy about it.
Budget of 1000€/USD and more
This is not a big change in comparison to the previous section. Like above, you can either buy a all-in-one solution or a kit. Everything will be larger. This is also the budget, where typical HERMS setup start (because they require three vessels and are thus pricier).
Summary
I hope this writeup helped you to make your decision which system is for you. Let us know your decision and if we forgot to mention something. Typical good buys after you bought the main parts of your brewing system will be the subject of a future Blog-Post.
Happy brewing,
Bernhard.